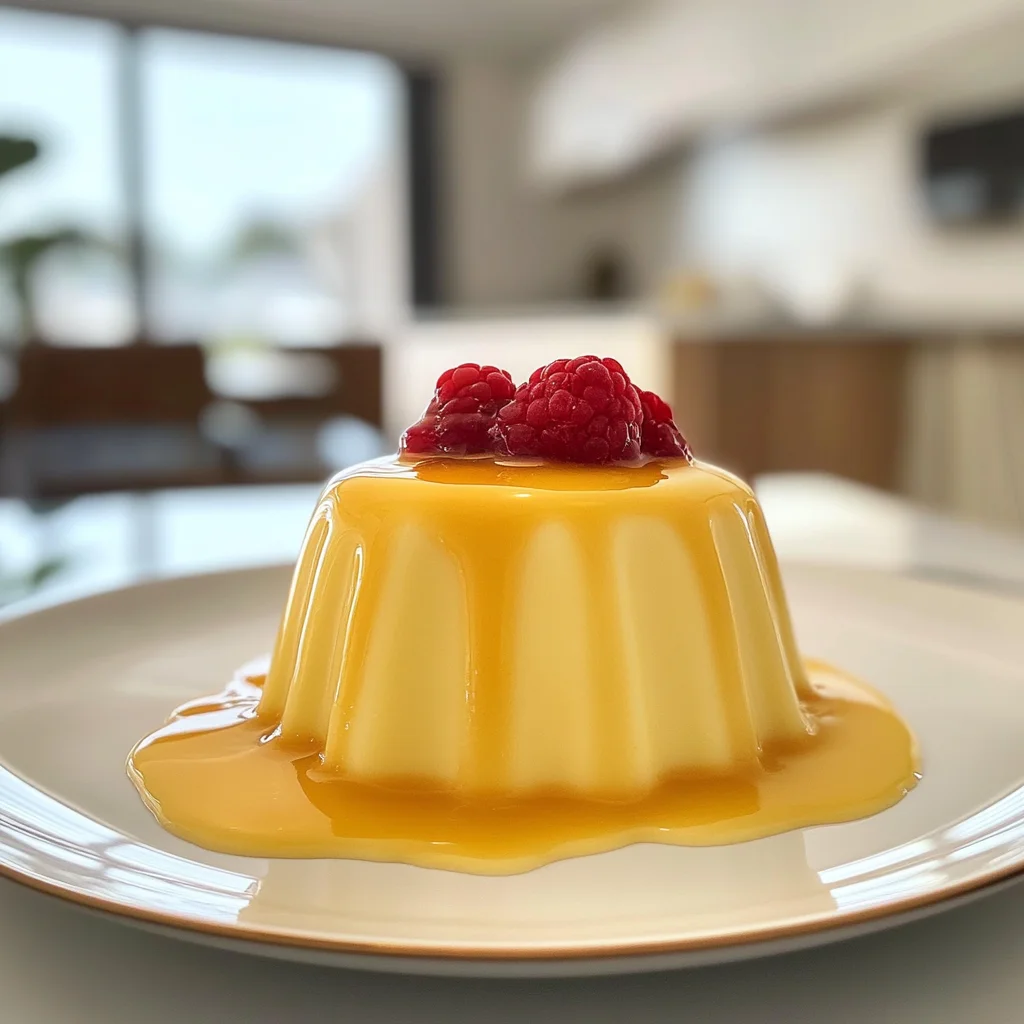
Imagine sinking your spoon into a bowl of velvety vanilla pudding desserts, where the sweet aroma of vanilla wafts through the air, promising a delightful experience. Each creamy bite melts in your mouth, leaving you with a sense of pure bliss that only a dessert this dreamy can deliver.
I still remember the first time I whipped up this vanilla pudding dessert for a family gathering; it was met with oohs and aahs as everyone eagerly dug in. Perfect for celebrations or simply to brighten up a weeknight, this easy-to-make treat guarantees to bring smiles and satisfied sighs with every spoonful, turning any moment into something truly special.
Why Will You Keep Making vanilla pudding desserts?
Creamy texture that melts in your mouth makes every bite a delight. Simple ingredients like milk, sugar, and pure vanilla extract ensure this dessert is approachable for all skill levels. Quick to prepare in just 15 minutes, you’ll save time while impressing guests. Versatile options allow for endless variations—top it with fruits, chocolate, or whipped cream! Finally, its crowd-pleasing appeal means this creamy classic will be a hit at any gathering.
vanilla pudding desserts Ingredients
- For the Pudding Base
- 2 cups milk (whole or 2%) – This adds creaminess; whole milk gives a richer flavor, while 2% is a lighter option.
- 1/2 cup granulated sugar – This sweetens the pudding, balancing the creamy texture and enhancing the vanilla flavor.
- 1/4 cup cornstarch – It acts as a thickening agent, ensuring your pudding has that perfect smooth consistency.
- 1/4 teaspoon salt – A pinch of salt elevates the sweetness and enhances the overall flavor of your vanilla pudding desserts.
- 2 teaspoons vanilla extract (pure vanilla) – Use pure vanilla for an authentic taste; it infuses the pudding with rich, aromatic notes.
- 2 tablespoons butter (unsalted) – This adds richness and a silky texture to your pudding, making it extra indulgent.
How to Make vanilla pudding desserts
1. Whisk together the granulated sugar, cornstarch, and salt in a saucepan. This will create a smooth base for your pudding, ensuring every bite is creamy and delightful.
2. Gradually add the milk (whole or 2%) while whisking continuously to combine all the ingredients. This step helps prevent lumps and ensures a velvety texture as you prepare your pudding.
3. Cook over medium heat, stirring constantly until the mixture thickens and begins to boil. Keep an eye on it, as this usually takes about 5-7 minutes; you want it to bubble gently.
4. Continue cooking for an additional 2 minutes once boiling, then remove from heat. This extra time allows the flavors to deepen and ensures your vanilla pudding is perfectly set.
5. Stir in the unsalted butter and pure vanilla extract until fully melted and combined. The butter adds richness, while the vanilla brings a delightful warmth to your dessert.
6. Pour the pudding into serving cups and let it cool at room temperature for about 10 minutes. This helps it start setting before you refrigerate it.
7. Refrigerate for at least 2 hours to allow your pudding to firm up properly before serving. The chilling time is crucial for achieving that creamy consistency we all love!
8. Serve chilled, optionally topped with whipped cream or fresh fruit for an extra touch of sweetness and color on your plate! Enjoy each delicious spoonful of your lovely vanilla pudding dessert.
Optional: Top with fresh berries for a burst of flavor!
Exact quantities are listed in the recipe card below.
Pro Tips for vanilla pudding desserts
- Milk Matters: Use whole or 2% milk for a creamier texture; skim milk may result in a thinner pudding consistency.
- Whisk Constantly: Stir continuously while cooking to prevent the mixture from sticking to the saucepan or forming lumps.
- Don’t Rush Boiling: Allow the pudding to boil for at least 2 minutes after thickening to ensure it sets properly; skipping this step can lead to a runny dessert.
- Chill Time: Be patient and refrigerate your pudding for at least 2 hours; this helps it firm up and enhances the flavors of your vanilla pudding desserts.
- Butter Bliss: Adding unsalted butter off heat enriches the flavor; be sure it melts completely for a smooth finish.
How to Store and Freeze vanilla pudding desserts
- Fridge: Store your vanilla pudding desserts in an airtight container for up to 3 days. This keeps them fresh and creamy for every delightful spoonful.
- Freezer: If you want to keep your pudding longer, freeze it in a freezer-safe container for up to 2 months. Just remember to leave some space at the top for expansion!
- Thawing: When you’re ready to enjoy, thaw the dessert overnight in the fridge. Stir gently before serving to restore its smooth texture.
- Reheating: If you prefer it warm, reheat gently on the stovetop over low heat, stirring constantly until just warmed through. Enjoy every comforting bite!
vanilla pudding desserts Your Way
Feel free to get creative and tailor this delightful recipe to suit your taste buds!
- Chocolate Bliss: Substitute 1/3 cup cocoa powder for 1/3 cup of the cornstarch for a rich chocolate flavor. This twist transforms the classic vanilla into a luscious dessert that’s perfect for chocolate lovers. Serve it chilled with whipped cream on top for an indulgent treat.
- Coconut Cream: Replace the whole milk with coconut milk and add 1/2 cup shredded coconut. This variation brings a tropical flair that dances on your palate, making each bite feel like a mini-vacation. Top with toasted coconut flakes for added texture and flavor.
- Almond Joy: Use almond milk instead of regular milk and add 1/2 teaspoon almond extract. The nutty sweetness enhances the vanilla beautifully, creating a comforting yet unique dessert experience. It’s ideal for those who enjoy a twist on traditional flavors.
- Spiced Vanilla: Incorporate 1/2 teaspoon cinnamon or nutmeg into the dry ingredients for a warm, aromatic touch. This cozy variation is perfect for fall gatherings or holiday celebrations, filling your kitchen with inviting scents that beckon loved ones to gather around.
- Fruit Fusion: Stir in 1 cup of fresh berries or diced fruit right before serving. This adds natural sweetness and vibrant colors to your pudding, making it not only delicious but also visually appealing. Perfect as a refreshing summer dessert!
- Maple Delight: Swap out granulated sugar for pure maple syrup (use about 1/3 cup). This creates a rich caramel-like sweetness while maintaining a smooth texture. Pair it with crushed walnuts for an extra crunch that will surprise and delight!
- Coffee Kick: Blend in 1 tablespoon instant coffee granules into the mixture before cooking. This addition gives your pudding a delightful caffeine boost, ideal for coffee lovers looking to indulge in something sweet yet sophisticated.
- Nutty Texture: Fold in 1/4 cup finely chopped nuts (like pecans or hazelnuts) after cooking for added crunch and depth of flavor. This simple addition can elevate your pudding, making it feel more decadent while offering satisfying bites throughout.
Make Ahead Options
This creamy vanilla pudding dessert is a fantastic choice for meal prep, allowing you to savor its delightful flavor without the last-minute rush. You can easily prepare the pudding base with 2 cups of milk, 1/2 cup of granulated sugar, and 1/4 cup of cornstarch up to 24 hours in advance. Start by whisking together the sugar, cornstarch, and salt in a saucepan, gradually adding the milk while combining. Cook until thickened and boiling, then stir in the butter and pure vanilla extract. After letting it cool to room temperature, you can refrigerate it for up to 3 days before serving. Just remember to give it a good stir before pouring into serving cups and topping with whipped cream or fresh fruit for that perfect finish! This way, your vanilla pudding desserts will taste just as fresh as if made that day.
vanilla pudding desserts Recipe FAQs
Can I use non-dairy milk for this vanilla pudding?
Absolutely! You can substitute whole or 2% milk with non-dairy alternatives like almond milk, coconut milk, or soy milk. Just ensure the non-dairy milk is unsweetened and has a similar consistency to dairy milk for best results.
How can I make my vanilla pudding thicker?
If your pudding isn’t thickening as expected, try increasing the cornstarch slightly—about an additional tablespoon should do the trick. Make sure to whisk it well with the sugar and salt at the beginning to avoid lumps while cooking.
What’s the best way to store leftover vanilla pudding?
To keep your vanilla pudding fresh, cover each serving cup tightly with plastic wrap or transfer it into an airtight container. It will stay delicious in the refrigerator for up to 3 days. Just remember to stir gently before serving again!
Can I freeze vanilla pudding for later use?
While you technically can freeze vanilla pudding, it’s not recommended as it may alter the texture. If you must freeze it, place it in a freezer-safe container and consume within 1 month. Thaw it overnight in the fridge before enjoying, but expect some changes in creaminess.
Is there a way to make this dessert lower in calories?
Certainly! You can reduce the granulated sugar by half or substitute it with a natural sweetener like stevia or erythritol. Using low-fat milk instead of whole or 2% can also cut down on calories without sacrificing too much flavor.
What’s a fun topping idea for my vanilla pudding?
For an extra touch of flavor and color, top your chilled pudding with fresh fruit like berries or sliced bananas. A dollop of whipped cream adds a delightful creaminess and makes for a beautiful presentation—perfect for any occasion!
Vanilla Pudding Desserts
Ingredients
Method
- In a saucepan, whisk together the sugar, cornstarch, and salt.
- Gradually add the milk while whisking to combine.
- Cook over medium heat, stirring constantly until the mixture thickens and starts to boil.
- Once boiling, cook for an additional 2 minutes, then remove from heat.
- Stir in the butter and vanilla extract until fully melted and combined.
- Pour the pudding into serving cups and let it cool to room temperature.
- Refrigerate for at least 2 hours to set before serving.
- Serve chilled, optionally topped with whipped cream or fresh fruit.