Imagine the thrill of shaking a bag filled with cream, sugar, and ice, as you create your own ice cream in a bag. The anticipation builds as you hear the crunch of ice against the bag, releasing sweet aromas that dance in the air, promising a creamy delight that will cool you down on a hot summer day.
Remember those carefree childhood afternoons spent outside, laughter echoing as friends gathered around for homemade treats? This simple yet inventive recipe brings back that joy, making it perfect for family gatherings or spontaneous weekend fun. With each shake, you’re not just making ice cream; you’re crafting memories that are as rich and delightful as the treat itself.
Why Is ice cream in a bag So Irresistibly Good?
Easy and Fun: Making ice cream in a bag is a delightful activity that everyone can enjoy, from kids to adults!
Quick Prep: With just 10 minutes of prep time, you can whip up a delicious creamy treat without any fuss.
Simple Ingredients: Using only heavy cream, milk, sugar, and vanilla extract means you’re in control of the flavors—perfect for customizing!
No Ice Cream Maker Needed: Say goodbye to bulky machines! This method is space-saving and requires minimal equipment.
Crowd-Pleaser: Whether it’s a family gathering or a summer party, this hands-on dessert is sure to impress guests of all ages!
ice cream in a bag Ingredients
For the Ice Cream Base
- 1 cup heavy cream (chilled) – This rich cream creates a smooth and creamy texture for your ice cream.
- 1 cup milk (whole or 2%) – Whole or 2% milk adds a delightful creaminess to balance the richness of the heavy cream.
- 1/2 cup granulated sugar – Sweetens the mixture perfectly, making it the ideal treat for any ice cream lover.
- 1 teaspoon vanilla extract – Adds warmth and depth of flavor, enhancing your homemade ice cream experience.
For the Ice Bag
- 3 cups ice – Essential for freezing your ice cream mixture quickly and effectively in this fun method.
- 1/2 cup salt (rock salt or kosher salt) – This helps lower the freezing point, making your ice cream freeze faster and smoother when using the “ice cream in a bag” technique.
Directions: ice cream in a bag
1. Whisk Together: In a large bowl, whisk together 1 cup of chilled heavy cream, 1 cup of whole or 2% milk, 1/2 cup of granulated sugar, and 1 teaspoon of vanilla extract until the sugar is fully dissolved.
2. Pour Mixture: Carefully pour the ice cream mixture into a zip-top bag. Seal it tightly, making sure to remove as much air as possible to prevent ice crystals.
3. Prepare Ice Bag: In another larger zip-top bag, add 3 cups of ice and 1/2 cup of salt (rock salt or kosher salt) to create the freezing environment.
4. Combine Bags: Place the sealed bag with your ice cream mixture inside the larger bag filled with ice and seal it tightly to lock in that frosty goodness.
5. Shake Vigorously: Shake the bags vigorously for about 5-10 minutes. You’ll know it’s ready when the mixture thickens and hardens to your desired creamy consistency.
6. Remove and Wipe: Carefully take out the smaller bag from the larger one. Wipe off any salt on the outside before opening it to keep your treat sweet!
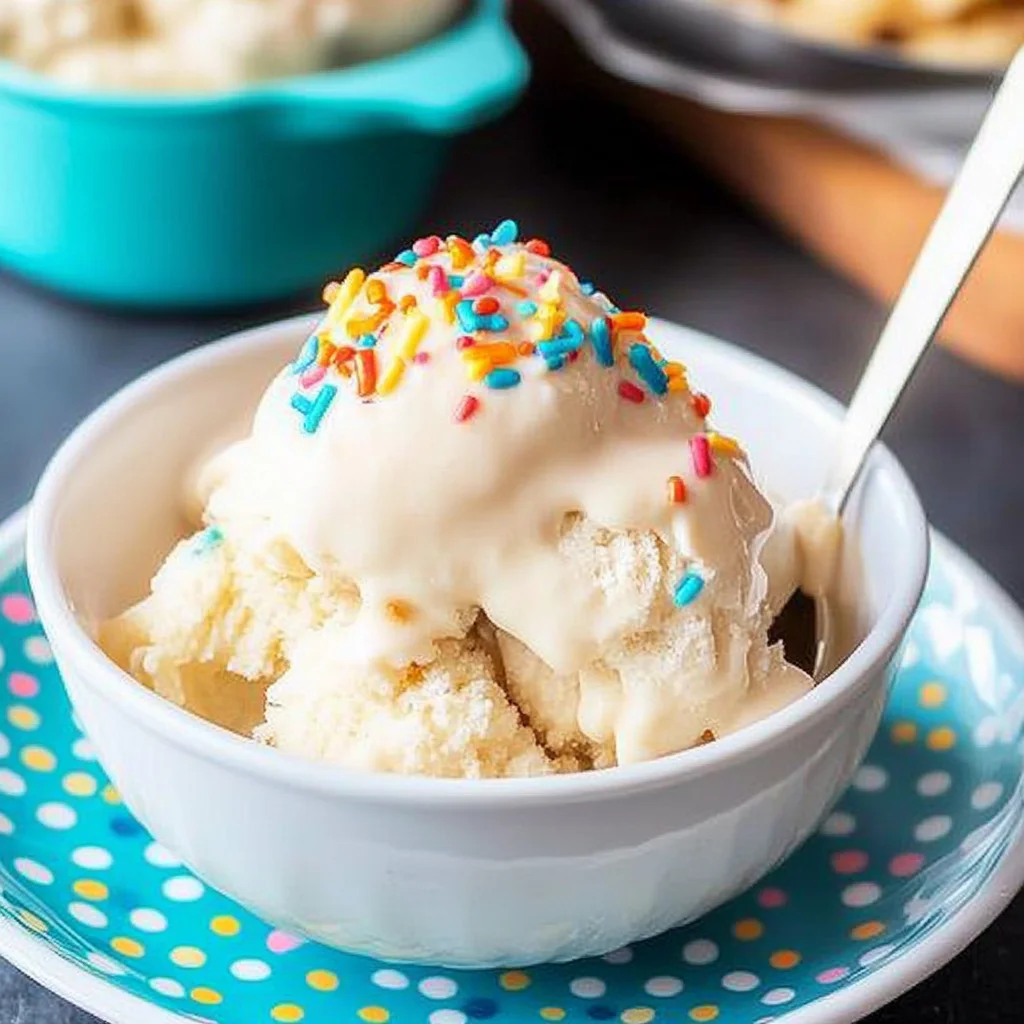
7. Serve and Enjoy: Scoop your delightful homemade ice cream into bowls and enjoy immediately for a refreshing treat that’s bound to bring smiles.
Optional: Top with chocolate syrup or fresh fruit for an extra special touch!
Exact quantities are listed in the recipe card below.
Expert Tips
- Chill the Cream: Ensure the heavy cream is well-chilled before starting. This helps achieve a creamier texture in your ice cream in a bag.
- Mix Until Dissolved: Whisk the sugar into the cream mixture until completely dissolved. Undissolved sugar will lead to a grainy texture instead of smoothness.
- Seal Tight: When placing your ice cream mixture in the zip-top bag, make sure it’s sealed tightly with minimal air. This prevents leaks and ensures even freezing.
- Use Enough Ice: Don’t skimp on the ice! A full 3 cups is essential for proper chilling and achieving that perfect creamy consistency.
- Shake Vigorously: Shake the bags for a full 5-10 minutes; less time may result in a slushy rather than creamy outcome. Consistency is key!
- Wipe Off Salt: Before opening the smaller bag, wipe off any salt to avoid accidentally mixing it into your delicious homemade ice cream in a bag.
How to Store and Freeze ice cream in a bag
- Fridge: Store your ice cream base ingredients, like heavy cream and milk, in an airtight container for up to 3 days before mixing.
- Freezer: Once your ice cream in a bag is made, transfer it to an airtight container and freeze for up to 2 weeks for the best texture and flavor.
- Ice Storage: If you’re preparing multiple batches, keep your ice and salt mixture in the freezer until ready to use; it can last indefinitely as long as it’s kept sealed.
- Serving: When serving leftovers, let the ice cream sit at room temperature for about 5-10 minutes before scooping to ensure a smooth serve.
ice cream in a bag Your Way
Get creative and transform your homemade treat into something uniquely yours with these delightful twists!
- Dairy-Free: Substitute the heavy cream and milk with full-fat coconut milk for a rich, creamy texture. Coconut milk adds a tropical flair that’s simply irresistible.
- Chocolate Delight: Replace half of the sugar with cocoa powder, and mix it well into the base for a luscious chocolate ice cream. This variation is perfect for chocolate lovers looking to indulge their sweet tooth.
- Fruit-Fusion: Blend in 1 cup of your favorite pureed fruit, like strawberries or mangoes, for a refreshing fruity twist. This not only adds vibrant color but also infuses natural sweetness into your ice cream.
- Nutty Crunch: Add 1/2 cup of finely chopped nuts, such as almonds or pecans, to the base before freezing. This gives your ice cream a delightful crunch and enhances its flavor profile.
- Minty Fresh: Stir in 1 teaspoon of mint extract instead of vanilla for a cool, refreshing taste. Pair this with crushed chocolate cookies for a mint chocolate chip sensation!
- Spicy Kick: Incorporate 1/2 teaspoon of cinnamon or even a pinch of cayenne pepper for an unexpected heat. The warmth from the spices creates a unique flavor experience that will surprise your taste buds.
- Cookie Crumble: Fold in crushed cookies like Oreos or chocolate chip cookies just before sealing the bag. This will create delicious chunks throughout your ice cream, adding fun texture and flavor with every bite.
- Coffee Boost: Mix in 1 tablespoon of instant coffee granules for a coffee-flavored treat that’s perfect for afternoon pick-me-ups. The deep flavor pairs beautifully with the sweet creaminess!
Make Ahead Options
This delightful ice cream in a bag recipe is perfect for those who love to plan ahead and enjoy homemade treats with minimal fuss. You can prepare the ice cream base—1 cup heavy cream, 1 cup milk, 1/2 cup granulated sugar, and 1 teaspoon vanilla extract—up to 24 hours in advance. Simply whisk these ingredients together until the sugar dissolves, then pour the mixture into a zip-top bag and seal it, removing as much air as possible. For the ice bag, you can pre-measure 3 cups of ice and 1/2 cup of salt (rock salt or kosher salt), storing them in a separate bag until you’re ready to make your ice cream. When it’s time to serve, just combine the two bags and shake vigorously for about 5-10 minutes until you reach that creamy consistency. This method not only saves time but also ensures you have everything ready for spontaneous family dessert nights!
Your ice cream in a bag Questions, Answered
Can I use different types of milk for the ice cream base?
Absolutely! While whole or 2% milk works best for a creamy texture, you can experiment with alternatives like almond milk or oat milk. Just keep in mind that the final product may be slightly different in creaminess and flavor.
How long can I store leftover ice cream made in a bag?
If you happen to have any leftovers (which is rare!), you can store your homemade ice cream in an airtight container in the freezer for up to one week. Just remember that the longer it sits, the icier and harder it might become. To soften it for serving, let it sit at room temperature for about 5-10 minutes before scooping.
What should I do if my ice cream isn’t thickening properly?
If your ice cream doesn’t seem to be thickening after about 5-10 minutes of shaking, try giving it a few more vigorous shakes! You might also want to check if your salt is coarse enough; rock salt or kosher salt works best since they lower the freezing point effectively.
How can I make this recipe dairy-free?
For a delicious dairy-free version, swap the heavy cream and milk for coconut cream and almond milk. Use 1 cup of chilled coconut cream and 1 cup of almond milk along with the sugar and vanilla extract. The result will be delightfully creamy with a subtle coconut flavor!
What’s a good serving size for this homemade ice cream?
This recipe makes about 4 servings, so scoop out approximately 1/2 cup per serving. At around 250 calories each, it’s a perfectly indulgent treat without going overboard!
Can I add mix-ins like chocolate chips or fruit?
Definitely! Feel free to fold in your favorite mix-ins like chocolate chips, crushed cookies, or fresh fruit once you’ve achieved that perfect soft-serve consistency. Just be mindful not to overfill your zip-top bag, as you’ll need some room for movement while shaking!
Ice Cream in a Bag
Ingredients
Method
- In a large bowl, whisk together the heavy cream, milk, sugar, and vanilla extract until the sugar is dissolved.
- Pour the ice cream mixture into a zip-top bag and seal it tightly, removing as much air as possible.
- In another larger zip-top bag, add the ice and salt.
- Place the sealed bag with the ice cream mixture inside the larger bag with ice and seal it tightly.
- Shake the bags vigorously for about 5-10 minutes until the mixture thickens and hardens to your desired consistency.
- Carefully remove the smaller bag from the larger bag and wipe off any salt before opening.
- Scoop the ice cream into bowls and enjoy immediately.